Renovación de un certificado SSL en su servidor de acceso de cliente
Certificados SSL están emitidos por períodos que abarcan de un
número de años (normalmente en múltiplos, por ejemplo, 1, 2 o más años –
sin embargo finalmente expirará que hacen y necesitan ser renovados.
The
renewal process involves generating a fresh CSR (Certificate Signing
Request) on one of your Exchange Client Access servers – this is then
sent to a root certification authority (for example VeriSign or Thwate)
for processing into a valid SSL certificate (essentially they sign the
request). El proceso de renovación implica la generación de una
nueva responsabilidad social de las empresas (solicitud de firma de
certificado) en uno de sus Intercambio de acceso de cliente de los
servidores – esto es entonces enviado a una autoridad de certificación
raíz (por ejemplo, VeriSign o Thwate) para su transformación en un
certificado SSL válido (esencialmente que firmar el petición).
In
order to generate a CSR file on the Exchange 2007 Client Access Servers
and Windows 2008 open the Exchange Management Shell [ START -> Programs -> Microsoft Exchange Server 2007 -> Exchange Management Shell ] and type the following command:
Con el fin de generar un archivo de la RSE en el Exchange 2007
Servidores de acceso de cliente de Windows 2008 y abrir el Shell de
administración de Exchange
[Inicio -> Programas -> Microsoft Exchange Server 2007 -> Shell de administración de Exchange] y escriba el siguiente comando:
New-ExchangeCertificate
-GenerateRequest -Path c:\myReq.csr -KeySize 1024 -SubjectName “c=GB,
s=Middx, l=MyCompany, ou=IT, cn=mail.mydomain.com” -PrivateKeyExportable
$True Nueva
ExchangeCertificate-GenerateRequest-Path c: \ myReq.csr
clave-1024-Sujeto “c = GB, s = Middx, l = miEmpresa, ou = IT, cn =
mail.mydomain.com”-Es cierto PrivateKeyExportable $
The string that you provide after the “ -SubjectName ” switch is VERY important it is made up of the following values: La cadena que proporcione después de la
“Sujeto” cambiar es MUY importante que se compone de los siguientes valores:
c= [This is the Country of origin] c = [Esto es el país de origen]
s= [This is the state (that you are in)] s = [Esto es el estado (que usted está en)]
i=
[This is the company that you work for - or indeed the SSL certificate
will be assigned to - you should note that if you ave purchased SSL
certificates before it is worth ensuring that the company naming
convention is consistent throughout all certificates that you have
purchased] i = [Esto es la empresa que trabajo
para usted - o, de hecho, el certificado SSL se asignará a - usted debe
tener en cuenta que si usted compró ave certificados SSL antes de que se
vale la pena asegurarse de que la empresa convención de nomenclatura es
coherente en todos los certificados que usted tiene adquirido]
ou=
[This is the organisation unit that the section of the company which
will take charge of the certificate - typically I enter in "IT" for this
value] ou = [Esta es la unidad de organización
que la sección de la empresa que se encargará del certificado - que
suelen entrar en "IT" para este valor]
cn= [This should be set to the DNS FQDN of the Client Access server which will be using the certificate - for example " OWA.mydomain.com " or " mail.mydomain.com " cn = [Esto debe establecerse en el DNS FQDN del servidor de acceso de cliente que va a utilizar el certificado - por ejemplo
"OWA.mydomain.com" o
"mail.mydomain.com"
This will produce a file in the root of c:\ on the CAS server called “ myReq.csr ” – this should be sent to Thwate. Esto producirá un archivo en la raíz de c: \ CAS en el servidor denominado
"myReq.csr" - esto debería ser enviado a Thwate.
When
the CSR has been generated you will be provided with a CRF (Certificate
Response File) which looks like the following (this will be returned to
you via e-mail): Cuando la RSE se ha generado se le
proporcionará una FCI (Certificado de archivo de respuestas) que se
parece a lo siguiente (este será devuelto a usted a través de e-mail):
-----BEGIN CERTIFICATE----- JJkbbssCCAuucgAwIBAgIQcyE6jZgwnFgAq0d7onjMFzANBgkqhkiG9w0BAQUFADCB zj ----- BEGIN CERTIFICADO ----- JJkbbssCCAuucgAwIBAgIQcyE6jZgwnFgAq0d7onjMFzANBgkqhkiG9w0BAQUFADCB ZJ
EEWNNNEBhMCWkExFTATBgNVBAgTDFdlc3Rlcm4gQ2FwZTESMBAGA1UEBxMJ Q2FwZSBUb3du EEWNNNEBhMCWkExFTATBgNVBAgTDFdlc3Rlcm4gQ2FwZTESMBAGA1UEBxMJ Q2FwZSBUb3du
MR0wGwYDVQQKExRUaGF3dGUgQ29uc3VsdGluZyBjYzEoMCYGA1UE CxMfQ2VydGlmaWNhdGlv MR0wGwYDVQQKExRUaGF3dGUgQ29uc3VsdGluZyBjYzEoMCYGA1UE CxMfQ2VydGlmaWNhdGlv
biBTZXJ2aWNlcyBEaXZpc2lvbjEhMB8GA1UEAxMYVGhh d3RlIFByZW1pdW0gU2VydmVyIENB biBTZXJ2aWNlcyBEaXZpc2lvbjEhMB8GA1UEAxMYVGhh d3RlIFByZW1pdW0gU2VydmVyIENB
MSgwJgYJKoZIhvcNAQkBFhlwcmVtaXVtLXNl cnZlckB0aGF3dGUuY29tMB4XDTA4MDcxMTE2M MSgwJgYJKoZIhvcNAQkBFhlwcmVtaXVtLXNl cnZlckB0aGF3dGUuY29tMB4XDTA4MDcxMTE2M
DU0OFoXDTEwMDcyNjE1NTcxN1ow gYYxCzAJBgNVBAYTADDDDDDjujjjjjw87666cvNxMJkeDE DU0OFoXDTEwMDcyNjE1NTcxN1ow gYYxCzAJBgNVBAYTADDDDDDjujjjjjw87666cvNxMJkeDE
PMA0GA1UEBxMGTG9uZG9u MSswKQYDVQQKEyJMb25kb24gQm9yb3VnaCBvZiBIb3Vuc2xvdyBD PMA0GA1UEBxMGTG9uZG9u MSswKQYDVQQKEyJMb25kb24gQm9yb3VnaCBvZiBIb3Vuc2xvdyBD
b3VuY2lsMQsw CQYDVQQLEwJJVDEcMBoGA1UEAxMTb3dhLmhvdW5zbG93Lmdvdi51azCBnzANB b3VuY2lsMQsw CQYDVQQLEwJJVDEcMBoGA1UEAxMTb3dhLmhvdW5zbG93Lmdvdi51azCBnzANB
gkq hkiG9w0BAQEFAAOBjQAwgYkCgYEAolvn0lT1W+cdRFjqOn56tPwHNULjq7LDA/G4 ZAIVf9 gkq hkiG9w0BAQEFAAOBjQAwgYkCgYEAolvn0lT1W + cdRFjqOn56tPwHNULjq7LDA/G4 ZAIVf9
cl7y4jLKR/6/3x2O/1st8OEcFDFKElmn8dzoA3pG14JL8ZmBTh0RLxtGRw 9fHB2ARuYplagoD cl7y4jLKR/6/3x2O/1st8OEcFDFKElmn8dzoA3pG14JL8ZmBTh0RLxtGRw 9fHB2ARuYplagoD
LqgA5mzEPo3a3wCKboTaEwKwoeQ9dAp2bGcvs4lMPptI48eoS DhFs/u0CAwEAAaOBpjCBozAd LqgA5mzEPo3a3wCKboTaEwKwoeQ9dAp2bGcvs4lMPptI48eoS DhFs/u0CAwEAAaOBpjCBozAd
BgNVHSUEFjAUBggrBgEFBQcDAQYIKwYBBQUHAwIw QAYDVR0fBDkwNzA1oDOgMYYvaHR0cDovL BgNVHSUEFjAUBggrBgEFBQcDAQYIKwYBBQUHAwIw QAYDVR0fBDkwNzA1oDOgMYYvaHR0cDovL
2NybC50aGF3dGUuY29tL1RoYXd0ZVBy ZW1pdW1TZXJ2ZXJDQS5jcmwwMgYIKwYBBQUHAQEE 2NybC50aGF3dGUuY29tL1RoYXd0ZVBy ZW1pdW1TZXJ2ZXJDQS5jcmwwMgYIKwYBBQUHAQEE
JjAkMCIGCCsGAQUFBzABhhZo dHRwOi8vpgthennn/ss88877a222129tMAwGA1UdEwE JjAkMCIGCCsGAQUFBzABhhZo dHRwOi8vpgthennn/ss88877a222129tMAwGA1UdEwE
B/wQCMAAwDQYJKoZIhvcNAQEF BQADgYEAuYSyeOUx53TkjCfol2psVY3E9uzMb6P6nrgs2U B / wQCMAAwDQYJKoZIhvcNAQEF BQADgYEAuYSyeOUx53TkjCfol2psVY3E9uzMb6P6nrgs2U
uG8BBQlshPkv+te8G2 JpaaaaCmcrCV8J0WQN8mRm5443vbdasafJTBxB2PAZfl3GSWEgDIH uG8BBQlshPkv + te8G2 JpaaaaCmcrCV8J0WQN8mRm5443vbdasafJTBxB2PAZfl3GSWEgDIH
q/lg3IOxG43YK4qD WYTu3j/Ngymq8g/d+0VrqkF/AmXWnGMGIQmE3GUnUDXeZKOR8SM= q/lg3IOxG43YK4qD WYTu3j/Ngymq8g/d = 0 VrqkF/AmXWnGMGIQmE3GUnUDXeZKOR8SM
-----END CERTIFICATE----- CERTIFICADO DE FINAL ----- -----
You should copy the CRF (including the “ Begin Certificate ” and “ End Certificate ”) into a text file called “ Owa.txt ” and then rename the file “ owa.cer ” – you should then copy this file up to a drive on the CAS server where you are working. Usted debe copiar el FCI (incluido el
"Certificado de empezar" y
"Certificado de finalización") en un archivo de texto llamado
"Owa.txt" y, a continuación, cambie el nombre del archivo
"owa.cer" - entonces usted debe copiar este archivo a una unidad en la la CAS servidor donde usted está trabajando.
Installing the Certificate on your Client Access Server: Instalar el certificado en su servidor de acceso de cliente:
Firstly
you need to remove the existing (expired) SSL certificate from your
Client Access Server - in order accomplish this you need to perform the
following steps:Open the Exchange Management Shell [ START -> Programs -> Microsoft Exchange Server 2007 -> Exchange Management Shell ]
En primer lugar usted necesita para eliminar el existente (de
vencimiento) certificado SSL desde el servidor de acceso de cliente –
con el fin lograr esto es necesario para llevar a cabo los pasos
siguientes: Abra el Shell de administración de Exchange
[Inicio -> Programas -> Microsoft Exchange Server 2007 -> de administración de Exchange Shell]
Then type in the following command: A continuación, escriba el siguiente comando:
Get-ExchangeCertificate | fl | out-file –filePath c:\certs.txt Get-ExchangeCertificate | piso | a-file-filePath c: \ certs.txt
This will create a text file in the root of C:\ called “ certs.txt ” which contains the details of every certificate install on the server – the output should look like the following: Esto creará un archivo de texto en la raíz de C: \ llamado
“certs.txt”, que contiene los detalles de cada certificado de instalar en el servidor – la salida debe ser parecida a lo siguiente:
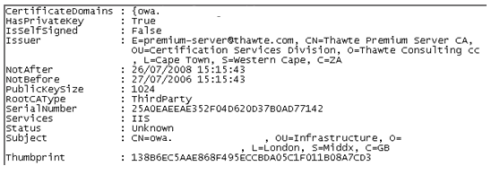 The
key property that will identify the certificate that you wish to
replace is the “Not After” field – as this is essentially the expiry
date and should have already expired or indeed be very close to
expiring.Make a note of the thumbprint (the long number at the bottom
after the “ thumbprint ” field) and then type in the following command:
The
key property that will identify the certificate that you wish to
replace is the “Not After” field – as this is essentially the expiry
date and should have already expired or indeed be very close to
expiring.Make a note of the thumbprint (the long number at the bottom
after the “ thumbprint ” field) and then type in the following command:
La propiedad clave que identificará el certificado que desea es
sustituir el “no después” sobre el terreno – ya que esta es
esencialmente de la fecha de caducidad y ya han expirado o, de hecho,
muy cerca de expiring.Make una nota de la impresión del pulgar (a largo
número en la parte inferior después de la
“huella dactilar” sobre el terreno) y, a continuación, escriba el siguiente comando:
Remove-ExchangeCertificate –thumbprint <The Thumb Print that you noted down> -Quitar la impresión del pulgar-ExchangeCertificate <La pulgar de impresión que anotó down>
As
a tip here is to copy the thumbprint from the text file above and then
paste it into the Powershell Window.When you have typed the command and
pressed enter you will be presented with the confirmation message – see below ;
Como un consejo aquí es para copiar la huella digital del archivo de
texto arriba y, a continuación, péguelo en la PowerShell Window.When que
ha escrito el comando y pulsa entrar se le presentará el mensaje de
confirmación –
véase más abajo;
Confirm Confirmar
Are you sure you want to perform this action? ¿Estás seguro de que desea llevar a cabo esta acción?
Remove certificate with thumbprint 138B6EC5AAE868F495ECCBDA05C1F011B08A7CD3? Eliminar certificado con la impresión del pulgar 138B6EC5AAE868F495ECCBDA05C1F011B08A7CD3?
[Y] Yes [A] Yes to All [N] No [L] No to All [S] Suspend [?] Help (default is “Y”):y [Y] Sí [A] Sí a todo [N] No [L] No a todos los [S] Suspender [?] Ayuda (por defecto es “Y”): y
Confirm the action by entering “ a ” and then press <ENTER> Confirmar la acción mediante la introducción de
“un” y luego pulse
<ENTER>
You
are now ready to import the new certificate onto the Client Access
Server – in order to do this type in the following command within the
Powershell window (ensure that the path you specify to the certificate
file matches the location where you placed the new certificate in the
earlier steps: Ahora está listo para importar el nuevo
certificado en el servidor de acceso de cliente – con el fin de realizar
este tipo en el siguiente comando en la ventana de PowerShell
(asegurarse de que el camino que se especifique para el archivo de
certificado coincide con el lugar donde se haya colocado el nuevo
certificado en las etapas anteriores:
Import-ExchangeCertificate -path e:\certificates\owa.cer –FriendlyName “owa.mydomain.com” ExchangeCertificate de importación-vía-e: \ certificados \ owa.cer-FriendlyName “owa.mydomain.com”
You should then be presented with the following output – again here you will need to make a note of the thumbprint:
A continuación, deberá ser presentada con la siguiente salida – de
nuevo aquí, usted tendrá que hacer una nota de la impresión del pulgar:
Thumbprint Services Subject Servicios de impresión del pulgar Asunto
———- ——– ——- —- — —
B52842F7408772B7151FF74FDAE914EA7B59B53A ….. B52842F7408772B7151FF74FDAE914EA7B59B53A … .. CN=owa.mydomain.com,… CN = owa.mydomain.com, …
Now
that the certificate has been imported into the certificates repository
you need to enable it for OWA – in order to do this run the following
command in the Powershell window: Ahora que el certificado ha
sido importado en los certificados de depósito que necesita a fin de que
pueda para OWA – a fin de hacer esto ejecute el comando siguiente en la
ventana de PowerShell:
Enable-ExchangeCertificate -Thumbprint B52842F7408772B7151FF74FDAE914EA7B59B53A -Services IIS -Activar la impresión del pulgar ExchangeCertificate-B52842F7408772B7151FF74FDAE914EA7B59B53A-Servicios de IIS
The new certificate should now be installed you can confirm this by running the following command: El nuevo certificado debe ser instalado, puede confirmar esta ejecutando el siguiente comando:
Get-ExchangeCertificate Get-ExchangeCertificate
The output of which should be: El resultado de lo que debería ser:
Thumbprint Services Subject Servicios de impresión del pulgar Asunto
———- ——– ——- —- — —
B52842F7408772B7151FF74FDAE914EA7B59B53A …W. B52842F7408772B7151FF74FDAE914EA7B59B53A W. … CN=owa.mydomain.com,… CN = owa.mydomain.com, …
The key thing here to note is the “ W
” under services (this signifies that the cert has been enabled for
OWA) and that the thumbprint matched what you have typed in previously.
La clave aquí es tomar nota de la “W” en virtud de los servicios (esto
significa que el CERT ha sido habilitado para OWA) y que la impresión
del pulgar corresponde lo que usted ha escrito en el anterior.
Fuente:
http://ramonmorillo.wordpress.com/renovacion-de-un-certificado-ssl-en-su-servidor-de-acceso-de-cliente/
 Dejo
una configuración básica para hacer funcionar los Zyxel USG con el FTTH
de Movistar. En principio sirve para cualquier Zyxel de la gama USG.
Probado en el USG 100 y USG 200.
Dejo
una configuración básica para hacer funcionar los Zyxel USG con el FTTH
de Movistar. En principio sirve para cualquier Zyxel de la gama USG.
Probado en el USG 100 y USG 200.


